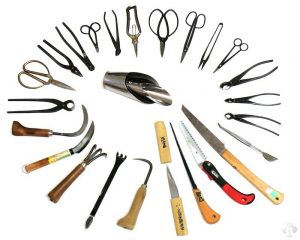
The Complete Beginner’s Guide to Essential Bonsai Products and Tools
Starting your journey into the ancient art of bonsai cultivation is an exciting adventure that combines patience, creativity, and a deep connection with nature. While the beauty of bonsai lies in the harmony between tree and artist, having the right tools and materials is fundamental to your success. This thorough guide will walk you through everything you need to purchase when beginning your bonsai practice, from the most essential cutting tools to specialized equipment that will help you develop your skills over time.
Understanding Tool Quality and Investment Strategy
Before diving into specific products, it’s important to understand the philosophy behind tool selection for bonsai. Unlike many hobbies where you can start with cheap alternatives, bonsai tools require a certain level of quality to function properly and avoid damaging your trees. However, this doesn’t mean beginners need to invest in the most expensive Japanese tools immediately.
The tool market offers various quality tiers, from Japanese handcrafted implements to Chinese manufactured alternatives. Japanese tools are renowned for exceptional quality and precision but come with premium pricing. Chinese tools have improved significantly in recent years, offering decent quality at more accessible price points. For beginners, quality Chinese or mid-range tools represent the sweet spot between performance and investment.
The Three Essential Cutting Tools
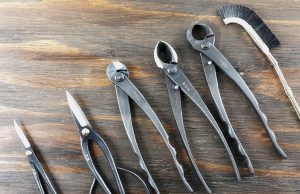
1. Bonsai Pruning Shears (Bud Scissors)
Your first and most important purchase should be a quality pair of bonsai pruning shears. These specialized scissors are the workhorse of bonsai maintenance, used for trimming shoots, removing leaves, and shaping foliage throughout the growing season.
Why Bonsai-Specific Shears Matter: Regular household scissors or garden shears simply won’t do the job properly. Bonsai shears feature razor-sharp, precisely aligned blades that create clean cuts without crushing delicate plant tissue. When cheap tools crush before they cut, they damage the tree’s vascular system and create entry points for disease. Quality bonsai shears slice through branches like a hot knife through butter.
Types to Consider:
- Butterfly Shears: Feature large, looped handles close to the blade. Excellent for trimming the outer canopy and roots during repotting. The comfortable grip makes them ideal for extended pruning sessions.
- Long-Handled (Slim) Shears: With a narrow profile measuring seven to eight inches overall, these are more versatile for beginners. The extended handles provide leverage while the thin tips can reach deep inside the tree’s canopy to trim interior branches without disturbing outer foliage.
Material Choice: Carbon steel blades (appearing black with silver cutting edges) are less expensive and sharper but require oiling after each use to prevent rust. Stainless steel models (fully silver) resist corrosion and require less maintenance but are more expensive and need more frequent sharpening. For beginners, carbon steel offers the best value.
Expected Investment: Quality beginner shears range from $15-40. Avoid anything under $10 as these often have thick, poorly aligned blades.
2. Concave Branch Cutters
The concave branch cutter is arguably the most important specialized tool in bonsai cultivation. This unique implement is designed specifically to remove branches from the trunk in a way that promotes smooth, flat healing with minimal scarring.
How They Work: Unlike regular pruning tools that create flat cuts, concave cutters feature curved blades shaped like two half-spheres. When you remove a branch, these blades bite into the wood, creating a slightly indented cut below the bark surface. As the tree heals, new tissue grows from the edges inward, eventually covering the wound completely. Within a few months to a year, you’ll barely be able to find where the branch was removed.
Why This Matters: In bonsai, we frequently remove branches to create the desired design. Using regular pruning tools leaves raised scars where each branch was attached, creating unsightly bumps that detract from the tree’s beauty. Proper concave cuts heal flush with the trunk, maintaining the illusion of a mature tree shaped by nature.
Variations Available:
- Standard Concave Cutters: With straight or semi-curved blades, suitable for most branch removal work
- Knob Cutters: Feature more spherical blades that create deeper indentations, ideal for removing thick branch stubs or creating jin (deadwood features)
Expected Investment: Quality concave cutters range from $25-60 for beginners. This is worth spending a bit more on, as poor quality versions won’t create proper concave cuts.
3. Wire Cutters
Bonsai-specific wire cutters are designed to remove training wire from branches without damaging the bark or cutting into the wood. While you might already own household wire cutters, the specialized design of bonsai wire cutters makes them invaluable for safe wire removal.
Special Design Features: Bonsai wire cutters have short, rounded cutting edges positioned perpendicular to the handles. This design allows you to slip the cutting edge under the wire coil and cut it flush against the branch without the handles interfering with surrounding foliage or accidentally damaging bark.
Why Not Regular Wire Cutters: Standard wire cutters have longer blades that extend parallel to the handles, making it difficult to get close to branches without damaging them. When wire has started to bite into growing bark, precision is critical to avoid tearing the embedded sections.
Expected Investment: Bonsai wire cutters range from $20-50. If budget is tight initially, you can start with household wire cutters and upgrade later, but bonsai-specific cutters will save you from accidental damage.
Bonsai Training Wire
Aluminum and Copper Wire Explained
Wiring is the technique that allows you to guide branches into artistic positions, creating the dramatic curves and elegant shapes that define bonsai. Understanding wire types and gauges is crucial for successful training.
Aluminum Wire
Best for beginners and deciduous trees
Anodized aluminum wire is the recommended starting point for new practitioners. Available in brown or black colors (though black eventually fades to brown in sunlight), aluminum wire offers several beginner-friendly characteristics.
Advantages:
- Significantly less expensive than copper, making mistakes more affordable during the learning process
- Softer and more forgiving to apply, reducing risk of bark damage
- Remains flexible even after application, allowing corrections
- Easier to remove without damaging branches
- Ideal for trees with thin, delicate bark like maples, elms, and olives
Disadvantages:
- More visible on the tree due to color contrast
- Less holding power, requiring thicker gauge wire to achieve the same results as copper
- May need replacing sooner on vigorous growing trees
Copper Wire
Preferred by advanced practitioners and for conifers
Annealed copper wire is the professional choice, particularly favored for exhibition trees and coniferous species. The annealing process (heating and slow cooling) softens the copper for application.
Advantages:
- Superior holding strength allows use of thinner gauge wire
- Work hardens after bending, maintaining position better than aluminum
- Natural color blends better with bark, especially on conifers
- Preferred for trees with strong growth like pines and junipers
- More professional appearance for display trees
Disadvantages:
- Typically twice the cost of aluminum wire
- Harder to apply correctly, requiring more skill and confidence
- Less forgiving of mistakes, can damage branches if applied incorrectly
- Rough surface can cut into soft bark on certain species
Selecting Wire Gauge
The fundamental rule for wire thickness is choosing a gauge approximately one-third the diameter of the branch you’re wiring. Wire too thin won’t hold the branch in position, while wire too thick increases the risk of damage during application and creates unsightly marks.
Essential Gauges for Beginners: Start with three gauges to handle most situations:
- 1mm: For delicate new shoots and small branches on miniature trees
- 2mm: The most versatile size for small to medium branches on typical beginner material
- 3.5mm: For thicker branches and small trunk movements
Expected Investment: Aluminum wire is very affordable. A 500-gram roll (enough for numerous projects) costs $15-30 depending on gauge. Start with 100-gram packages of different sizes to determine which you use most. Copper wire costs roughly double.
Repotting and Root Work Tools
Root Hook and Root Rake
Repotting is a fundamental bonsai skill that maintains tree health and controls growth. Specialized root tools make this process safer and more effective.
Root Hook: This simple bent metal tool is indispensable for loosening compacted soil and gently combing out circling roots during repotting. The hook allows you to tease apart root masses without ripping fine feeder roots that are crucial for the tree’s recovery.
Root Rake: Features multiple prongs (typically three) on one end, ideal for removing old soil from larger root systems and leveling fresh soil in the pot. Many models offer dual ends with different configurations for versatility.
Expected Investment: Root hooks and rakes cost $10-25. Dual-end combination tools offer the best value for beginners.
Tweezers and Spatula
These precision tools might seem like minor accessories, but they prove invaluable for detailed work.
Applications:
- Removing weeds from pot surface without disturbing roots
- Plucking spent pine needles from interior branches
- Positioning moss or accent plants
- Tamping soil around roots during repotting
- Cleaning debris from branch crotches
Expected Investment: $8-20 for quality bonsai tweezers with spatula attachment
Soil and Growing Medium
Understanding Bonsai Soil Requirements
Perhaps the single most important concept for beginners to grasp is that bonsai soil is fundamentally different from regular potting soil. Using standard garden center potting mix in bonsai containers is one of the fastest ways to kill your tree.
Why Bonsai Need Special Soil
Bonsai soil must accomplish three sometimes contradictory goals simultaneously:
- Excellent Drainage: Excess water must drain immediately to prevent waterlogged roots
- Adequate Water Retention: Sufficient moisture must remain between waterings
- Proper Aeration: Air pockets between particles provide oxygen to roots and support beneficial bacteria
Achieving this balance requires using inorganic components with specific particle sizes that create structure while managing moisture.
Primary Soil Components
Akadama: The gold standard for bonsai soil, akadama is a hard-baked Japanese clay specifically produced for bonsai cultivation. Available in different grades and particle sizes, it absorbs water while maintaining structure. High-quality akadama lasts about two years before breaking down, requiring repotting to maintain aeration. Its premium price makes it worthwhile for refined trees but potentially excessive for trees in early development.
Pumice: A volcanic rock that provides excellent drainage while retaining some moisture. Pumice is lightweight, doesn’t break down, and works well across all tree species. It’s particularly valuable for collected trees and those requiring maximum aeration.
Lava Rock: Provides drainage, aeration, and doesn’t decompose. The rough surface encourages fine root development. Some practitioners use 100 percent lava rock for developing material with excellent results.
Fine Gravel (Grit): Adds weight to pots for stability and improves drainage. Often used in smaller percentages within mixes.
Recommended Soil Mixes
Standard Mix for Most Trees: A blend of 50 percent akadama, 25 percent pumice, and 25 percent lava rock works well for the majority of bonsai species. This balanced mix provides good water retention with adequate drainage.
Budget-Friendly Alternative: Equal parts pumice and lava rock (50/50) creates an effective, affordable mix. Some growers use this combination exclusively with excellent results.
For Infrequent Watering: If you cannot water daily, increase the akadama percentage or add small amounts of organic compost to retain more moisture. However, be cautious as organic materials decompose and reduce drainage over time.
Expected Investment: Pre-mixed bonsai soil costs $15-35 for a bag sufficient for several trees. Individual components purchased separately may be more economical long-term if you maintain multiple trees.
Containers and Pots
Training Pots vs Display Pots
Understanding the distinction between training and display containers helps beginners make appropriate choices for trees at different development stages.
Training Containers
Most beginners should focus on inexpensive training containers rather than premium display pots. Trees in development need frequent repotting and benefit from larger containers that promote growth.
Plastic Training Pots: Basic plastic pots with good drainage are perfectly adequate for developing material. They’re inexpensive, lightweight, and come in various sizes. The savings allow you to focus budget on quality tools and proper soil.
Anderson Flats: Square, perforated plastic containers favored by professionals for developing stock. The mesh bottom promotes air pruning of roots and excellent drainage. Trees can be placed directly on the ground, allowing roots to grow through into earth for vigorous development.
Colanders and Pond Baskets: Some growers use kitchen colanders or pond baskets for aggressive root development. The extensive perforations provide maximum aeration and prevent circling roots.
Terra Cotta Pots: Traditional clay pots offer several advantages over plastic. The porous material helps regulate moisture, and imported Japanese terra cotta pots feature proper drainage and wire holes. They’re also closer in proportion to bonsai display pots, bridging the gap between development and refinement.
Display Pots (Bonsai Containers)
Authentic bonsai pots are works of art themselves, often handmade by skilled potters. However, beginners should generally wait to invest in premium display pots until their trees are refined enough to warrant them.
Essential Features:
- Drainage Holes: At minimum one large hole, preferably multiple holes for optimal drainage and aeration
- Wire Holes: Small holes near drainage openings allow you to secure the tree to the pot with wire, critical for stability
- Appropriate Depth: Bonsai pots are notably shallow compared to standard planters. This restricts root growth and contributes to the miniaturization effect
Choosing the Right Size and Style
Pot selection follows traditional aesthetic principles balancing masculine and feminine characteristics of both tree and container.
Size Guidelines:
- Pot depth should equal trunk thickness just above the root base
- For oblong pots, length should be approximately two-thirds the tree’s height
- For round or square pots, width should be about one-third the tree’s height
- Leave one inch between root tips and pot sides
Style Matching: Trees with heavy trunks, dense foliage, sharp angles, and deadwood features are considered masculine and pair well with deep, angular pots with clean lines. Trees featuring graceful curves, smooth bark, delicate branches, and flowers are considered feminine and suit shallow, rounded pots with softer lines.
Expected Investment: Training pots cost $5-20 depending on size. Quality display pots range from $30 for basic ceramics to hundreds or thousands for handmade pottery from renowned artists.
Watering Equipment
Proper Watering Tools
Correct watering technique is absolutely critical for bonsai health, making appropriate watering equipment surprisingly important.
Watering Can with Rose: A watering can fitted with a rose (the perforated nozzle) provides gentle, rain-like water distribution. The soft spray prevents soil disturbance and erosion while thoroughly saturating the root ball. Look for cans with long spouts that reach across benches without disturbing other trees.
Watering Wand: For collectors with multiple trees, a hose-end watering wand with adjustable shower settings provides efficient watering. The extended wand allows you to reach all areas without excessive bending.
Moisture Meter: While experienced practitioners learn to judge soil moisture visually and by weight, beginners benefit from moisture meters that provide objective readings. Insert the probe into various locations around the pot to check moisture levels at different depths.
Expected Investment: Quality watering cans with roses cost $20-50. Watering wands range from $15-40. Moisture meters cost $10-30.
Fertilizers and Nutrients
Understanding Bonsai Fertilization
The limited soil volume in bonsai containers means nutrients become depleted quickly. Regular fertilization during the growing season is essential for maintaining tree health and vigor.
NPK Ratios Explained
All fertilizers display three numbers representing the ratio of primary nutrients:
- Nitrogen (N): Promotes leaf and stem growth above ground
- Phosphorus (P): Supports root development, flowering, and fruiting
- Potassium (K): Enhances overall plant health and disease resistance
While traditional advice suggested varying NPK ratios seasonally, many experts now recommend using balanced fertilizers throughout the growing cycle for consistent development.
Liquid vs Solid Fertilizers
| Characteristic | Liquid Fertilizer | Solid Fertilizer |
|---|---|---|
| Application | Diluted in water during watering | Placed on soil surface in cups/baskets |
| Availability | Immediately available to roots | Slow release over weeks/months |
| Frequency | Weekly to every watering | Monthly during growing season |
| Root Burn Risk | Lower if properly diluted | Higher if over-applied |
| Convenience | Requires consistent application | Set and forget approach |
| Waste | Washed away with each watering | Less waste, gradual release |
Recommended Fertilization Approach
For Beginners: Start with a balanced liquid fertilizer (3-3-3 or 6-6-6) applied at half strength weekly during the growing season. This gentle, consistent approach prevents dramatic nutrient swings while ensuring adequate nutrition.
Advanced Option: Many practitioners prefer organic solid fertilizers like Biogold (NPK 6-7-4) placed in covered baskets on the soil surface. These pellets release nutrients gradually and won’t burn roots, though they’re more expensive than liquid alternatives.
Fertilization Schedule
Outdoor Trees: Fertilize weekly from early spring through mid-autumn. Use higher nitrogen formulas (10-6-6) in spring for growth